Daisypath Anniversary tickers

What to do, What to do

Tuesday, December 29, 2009 Posted In Edit This 0 Comments »
Since we purchased our home, I have been the one who has lead the painting project. For the most part, it's been easy. I had an inspiration picture of our living room and consequently matched the paint color to that. We got our master bed spread as a wedding gift so that dictated what color the master would be. Our bathroom tiles are brown so we went bold in the bathroom and painted it Trusty Tan by Sherwin Williams. And I was veeery forward thinking with the 2nd and 3rd bedrooms by painting them kid friendly colors. Note I said *very forward thinking, no bun in the oven yet.

Even part of the kitchen was a done deal. Scottie ordered too much paint for the living room so we decided to paint bits of the kitchen in the same color.

Enter the dilemma.

I have two walls in the kitchen that I want to paint and have them be a bit bolder since the Ionic Ivory by Sherwin Williams that is currently on the walls is very nuetral. I've narrowed it down to two very similar colors but just can't make my mind up!!

The living room and parts of the kitchen are painted Ionic Ivory, which is in the middle of the colors below. A very subtle color. Again I want to paint two walls a more bold color to add some drama to the room. I'll also paint the hallway to the bathroom/bedrooms this bolder color. The top one is called Burlap. The bottom one is called Quiver Tan. I think I may be leaning towards Burlap but boy this is a tough choice. I will get samples of both but I still don't think I'll be able to make my mind up.

Oh, the pressure!

Progress

Monday, December 21, 2009 Posted In Edit This 0 Comments »
Well, we are making progress. Unfortunately we are STILL not in the house. All we need is 1) Grouted tile in the bathtub, and 2) An installed toilet. Both of which are supposed to be complete tonight. The rest of the stuff can be completed while we are living in the house. I am praying that the above projects will actually be done tonight. All I want for Christmas is to sleep in our house on Christmas Eve!!
Enjoy some "transition" pictures.
Third Bed Room. Paint is Sky High by Sherwin Williams. In this room we still need new light fixtures and the baseboard to be installed.
This picture is showing the reducer between the wood floors and tile. We originally were going to do the plain old metal ones - I'm really happy Scottie decided to do a wood reducer, I think it adds a lot.
Our new tiles! The kitchen/bathroom/hallway have the same tiling. This is a view from the bathroom into the kitchen.
This is our sink nook.
The newly tiled tub! It still needs grout as I mentioned above. The bathroom still requires trim around the window and door, grout, a toilet and a sink.
I just had to share.. The first snow at our house!
Scottie working very hard at refinishing our cabinets. This has been quite the project.
Left side is the old cabinet. Right side is the new cabinet (not stained yet).
Baxter in his work suit!
Second Bedroom. Paint is Full Moon by Sherwin Williams. We still need to install light fixtures and baseboards in this room.
And to give you some perspective of the outside of the house. This picture is before we put shutters on, before we landscaped the right side of the house (no time to do the left side this season!), and before we painted the light post.
Shrubs being installed...
And the (almost) final product! I was hesitant to go with the Cranberry colored shutters. Mainly because the windows are trimmed with a dark brown color (that I hate). We do, however, intend to replace the windows next Spring and the trim will hopefully be a cream color so the Cranberry hopefully will not stand out quite as much as it does now.

Experienced Home Owner Here

Wednesday, November 18, 2009 Edit This 0 Comments »
So now that we've been home-owners for almost a month, I can pass on my wisdom to those less wise than I.

- First, don't believe anything on HGTV. When they show their rennovations, they choose to show you the easy stuff. They don't show you all the work you have to do to get to the easy stuff. For example, they show people painting their walls. Well first, you have to wash the nicotine off the walls. Twice. Then you have to fill all the holes in the walls. Then you have to sand down all the bumps on the walls. Then you prime. In some cases twice (nicotine). Then you paint. A total of about two week's of work.

- Second, if you think you're the type for rennovations, maybe volunteer to help a friend or test it out before you buy a complete fixer upper. I've more or less enjoyed this process. Scottie on the other hand has not. He does not have rennovating in his blood. Which we had a sneaking suspision he wouldn't. We didn't realize however they he would hate it... Loathe it... Despise it.

- If you think something will take a week, it will probably take two.

- If you think something will cost $1,000, it will probably cost $2,000.

I love owning a home, really! I can't wait to actually live in it, though. I hope to live in it in two weeks. At least partially. I was so nieve at closing when I said I thought we'd be in the house in two weeks. Ohhhh the humor.

Anyhow at least now we are at the stage where we are done ripping stuff out. Now we're bringing the new stuff in.

Here are some pictures of day 1 for you to enjoy. I do apologize if smoke/nicotine starts fuming out of your computer screen.
Living Room. Great picture window. All the 70's fixtures have been taken out.
Dining Room Area. The top cabinets facing the dining room has been removed to open the space up more.
Master.
Closet in Master.
Second Bedroom.
Bathroom.
Tub. *Gags*Vanity.
Third Bedroom. Shelves are removed.
Third bedroom. Built in desk and shelves are removed.
Kitchen. Built in desk is removed.
Kitchen.
Let the work begin! Taking the cabinets out.
The nicotine drenched carpet being ripped out. It smelled pretty bad.

We Are Home-Owners!

Thursday, November 05, 2009 Edit This 1 Comment »
Who would have known owning a home was so sexy? Scottie and I have been proud owners for exactly one week. On October 29, Scottie and I closed on our first home.

The day we closed we went for one final walk through before the closing. The previous owner did a great job with cleaning - especially considering she was no spring chicken and it probably took a lot out of her to clean so much.

We went to closing not knowing what to expect. The closing went just how they show it on HGTV! Scottie and I bought some champagne and handed it out to everyone as all of the checks were distributed. What I found strange was the our Real Estate Agent and our Mortgage Broker both said they NEVER had champagne at a closing! OK so maybe HGTV does exagerate a bit on the closing process but I couldn't have imagined our closing without a little bubbly!

That night we had my parents and Scottie's mom over to pretty much rip EVERYTHING out. The previous owner was a smoker so we had to remove carpet, counters, the entire bathroom, amongst other things. She really hadn't done much to the house in about 25 years so there were old built in desks and super old light fixures that had to come out.

I will post "before" pictures soon. At this point we pretty much have a completely gutted house. This past week has been a ton of work but hopefully by next week we can start bringing new things in. Right now the two biggest projects include priming and painting all the walls, sanding down the bathroom walls since they were tiled and now the old ahesive is on the walls, and installing our new hard wood floors in the dining/living room. Yes, we are doing that all ourselves. Luckily we have so much support around us so we are getting tons of help.

During this past week, I have felt the following adjectives:

Happy, relieved, fortunate, complete, nervous, anxious, excited, exhausted, mad, annoyed, sad, patient, impatient, cold, hot, overwhelmed, confused, strong, weak, wet, smelly, bloody, bruised, defeated, empowered, did I mention exhausted?

But most importantly I have felt BLESSED to drive up to the house and call it OUR HOME.

Banana Cake

Saturday, October 24, 2009 Posted In Edit This 0 Comments »
On Scottie's birthday we had a few friends and some family over at my parent's house for some cake and ice cream. I made a yummy banana cake that seemed to go over well. It tastes just like banana bread but with a great cream cheese frosting on it. Every little thing about this cake is fattening... Enjoy!

Ingredients:

1 ½ cups ripe bananas (mashed)
2 tablespoons lemon juice
3 cups flour
1 ½ teaspoons baking soda
¼ teaspoon salt
¾ cup butter (softened)
2 1/8 cups sugar
3 eggs
2 teaspoons vanilla extract
1 ½ cups buttermilk

Cream cheese frosting
½ cup butter (softened)
1 (8 ounce) package cream cheese (softened)
1 teaspoon vanilla extract
3 ½ cups icing sugar
Walnuts (chopped, for garnish)

Step 1: Pre-heat the oven to 275 degrees. Grease 2, 8” round baking pans.

Step 2: In a small bowl mix mashed bananas and lemon juice. Set aside. In a medium bowl mix flour, baking soda and salt. Set aside. In a large bowl cream ¾ cups butter and 2 1/8 cups sugar until light and fluffy. Beat in eggs one at a time. Stir in vanilla extract. Beat in the flour mixture alternately with the buttermilk. Stir in banana mixture.

Step 3: Evenly pour batter into 2, 8” round baking pans. Bake for 1 hour to 1 hour and 30 minutes or until a toothpick comes out clean. Between those times keep checking on the cake with a toothpick to see if it’s done. When the cake is done take the baking pans and place them directly into the freezer for 45 minutes to cool.

Step 4: While cake is cooling, to make the frosting- In a bowl cream the butter and cream cheese until smooth. Beat in vanilla extract. Add icing sugar a little at a time and beat on low until combined. Then beat on high until smooth.

Step 5: Remove the cake from the pans and lay out the bottom half on a plate. Spread it fully with frosting. Add the top half and cover the entire cake with frosting. Add chopped walnuts on top.(Makes 14 Servings)

Happy Birthday!

Thursday, October 22, 2009 Edit This 0 Comments »
Happy Birthday to my wonderful husband. Today Scottie turns 26 years old. He is now officially closer to 30 than 20 ... oh boy! I've known Scottie for 11 of his 26 years and I'm still learning new things about him everyday. Happy Birthday monk!

Success!

Tuesday, October 20, 2009 Posted In Edit This 0 Comments »
We just heard back from Chase, they have given us the final approval for the mortgage! Yes! Now we just have to wait to hear back from the Rural Department (which is backing the loan) and we should be clear to close! I'm hoping it will happen before 10/30. *fingers and toes are crossed*

Our First House Project

Tuesday, October 13, 2009 Posted In Edit This 2 Comments »
Dear JP Morgan Chase,

I know things are tight for you right now. I know you are trying to figure out what to do with the thousands of defaulted mortgages you have on your plate. I get that. But can you please take my word when I say that Mr. Peterson and I are to be trusted with the money you hand over to us? We will make our payments on time, I promise. Believe me, we lived in a yippe Chicago suburb for 1.5 years; this mortgage payment is going to seem like a few bucks in comparison to our rent check in Naperville.

Now that we have given you everything -- and I mean every single bit of information we have on ourselves, we just ask you to hurry on up with a check -- we have a first time home buyers tax credit with our name on it and we have a month and a half before the governmet takes that opportunity from us. Please. Please. Please, oh pretty please.

Back to the topic of this post... Our First House Project. And you did read correctly, we still have no financing but we are working on the house.

Scottie and I came upon a little bump in the road in the form of a garage. Banks today are very picky about the condition of the home. If anything is considered a health risk, they want you or the buyer to fix it. So if we do default on the mortgage, they do not have a house that someone could get sick or hurt at. Well, our lovely garage had *some* paint chips. I stress the word some. The bank decided our financing was contingent on the entire garage being repainted.... Fantastic.

So the past two weeks we power washed, sanded down, and primed the garage. We also had to clean the entire area around the garage to get rid of any fallen paint chips. And that was no simple task my friends. The area around the garage probably had not been raked in a good 6 years. There were tons of old leaves and dirt that had to get raked or vacumed up.

Below are some pictures of our progress. Thanks to our great Wisconsin weather, our painting has haulted. We do have everything primed up, so we can move forward with financing; we just have to wait for it to be at least 60 degrees or so in order for the paint to stick well.
This area on both sides of the fence used to have huge clumps of old leaves and mulch. It looks so much better now that it is all cleaned, I am so excited!
The awning area, again completely cleaned up. Prior to this you could not see the ground at all.
The garage door view. We kept the original garage door color. We are going to wait to see how the main color paint comes on and hope to find a nice compliment color for it.
The next pictures give you an idea of what the garage color USED to be. This is the door to the small patio that is attached to the garage.
This is a window frame right before it was primed.
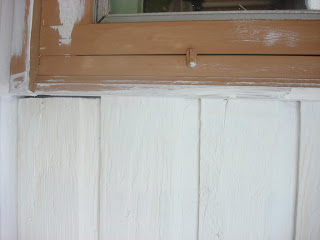
More of the old color.
Close up of the old color. As you can see in this picture, there was practically NO chipping anywhere. Big bummer. But, the color is pretty retro so I suppose we eventually would have changed the color. Probably not the first project we would have chosen, though.

Fall Recipe

Thursday, September 24, 2009 Posted In Edit This 0 Comments »
I found this recipe on http://www.thenest.com/ and gave it a whirl for my mom and Scottie to try. I think it went over fairly well! Who is this recipe geared towards? Men! There could not be a better soup to serve on a fall afternoon. What would be better? Serve it on a Packer game day in the fall. Mmmmmm. It is VERY flavorful and even MORE filling!

Mac & Cheese Soup
Makes 8 servings

Ingredients

10 slices thick-cut bacon (substitute turkey bacon you health-concious people)

1 medium onion, finely chopped

2 cloves garlic, crushed

¼ cup all-purpose flour

One 14-ounce can vegetable broth

3 cups whole milk (substitue 2% milk for healthy folks)

1 tablespoon good-quality chili powder

1 teaspoon black pepper

1 teaspoon dry mustard

4 cups (1 pound) shredded sharp Cheddar cheese

1 1/2 cups dried elbow macaroni, cooked

Chopped fresh parsley, for garnish

Directions

Step 1 Cut the bacon strips into quarters. In a Dutch oven over medium heat, cook the bacon until crisp. Remove it to paper towels to drain.

Step 2 Add a little oil to the pan if needed, then add the onion. Cook the onion for 5 minutes, stirring occasionally. Add the garlic and continue cooking until the onion is soft and lightly browned, about another 5 minutes.

Step 3 Add the flour and mix well. Cook for 2 minutes. Add the broth and bring to a simmer, stirring often.

Step 4 Add the milk, chili powder, pepper, and mustard. Return the soup to a simmer, stirring occasionally. Cook for 3 minutes. Add the cheese and bacon and continue cooking and stirring until well blended, about 4 minutes.

Step 5 Add the macaroni and return to a simmer. Remove from the heat and serve, sprinkling with parsley.